Showing posts with label fun. Show all posts

Monday, August 4, 2014

DIY: FUN FLIP FLOPS

DIY: FUN FLIP FLOPS


The Task: Make some fun flip flops
 
The Ingredients: inexpensive flip-flops (Dollar Tree again), water resistant crazy glue, a pair of shoelaces, a plastic wind chime (I know, random, huh? :-)), scissors
  
The Purchase Locations: Dollar Tree


The Cost: Approx $4.00
 
It only took me: about 20 minutes 

How to:


1. Cut the plastic straps off each flip-flop.

 2. Determine how long you want the straps of your sandals. Fold one shoe string in half and push the loop through the top hole in the flip-flop from the top/front of the flip flop through the back/bottom.
 
3. Turn the flip flop over and tie a big knot or two in the looped part of the shoe string. 
 4. Pull the shoe string down as close to the hole as possible, then add a drop or two of water resistant glue to the hole. Pull the ribbon all the way down first, so you don't get a sticky ribbon.
5. Pull the knot down into the hole and tuck it into the hole so the knot is flush to the bottom of the flip flop (This will keep you from constantly feeling like you are stepping on a rock when you walk).


6. Turn the flip flop back over to the top.  You should now have two shoe string "straps".  Yay! 
 
7. Pull the left shoe string strap through the hole on the left bottom of the flip flop.  Then, pull the right shoe string strap through the hole on the right bottom of the flip flop.   Be sure to leave enough ribbon on top so a foot can fit.  (It may be helpful to try the flip flop on while you pull the straps through for accuracy.) 
 
8. Turn the flop flip over to the bottom. Take the strap on the left and pull it through the hole on the right from back/bottom to front/top. Take the strap on the right and pull it through the hole on the left from back/bottom to front/top.
 
6.  Cut the excess shoe string from the top of the flip flop.
 
7. Add a bit of glue to each hole to secure the straps. 
 
8. Repeat these steps with your second flip flop.
 
9.  Glue any fun treats to the top flip flop strap.  In my case, I found a cute pink and green wind chime.  So, I cut one of the flower charms off of the wind chime and glued it onto my flip flip. 
 

ENJOY!!!

Thursday, July 3, 2014

DIY: July 4th Inspired Sandals

DIY: July 4th Sandals


The Task: Make some cute sandals for the 4th of July 
 
The Ingredients: inexpensive flip-flops (Dollar Tree again), water resistant crazy glue, ribbon, scissors

The Purchase Locations: Dollar Tree

The Cost: Approx. $3.00

It only took me: about 15 minutes

How to:
 
1. Cut the plastic straps off each flip-flop.

 2. Determine how long you want the straps of your sandals. (In hindsight, I wish I had made mine longer so they could wrap around the ankle a few more times.) Cut your ribbon at the desired length.  Fold the ribbon in half and push the loop through the top hole in the flip-flop from the top/front of the flip flop through the back/bottom.


3. Turn the flip flop over and tie a big knot or two in the looped part of the ribbon. 

 4. Pull the ribbon down as close to the hole as possible, then add a drop or two of water resistant glue to the hole.  (Be sure to pull the ribbon down first. Otherwise, you'll end up with a sticky ribbon.
 
5. Pull the knot down into the hole and tuck it into the hole so the knot is flush to the bottom of the flip flop (This will keep you from constantly feeling like you are stepping on a rock when you walk).


6. Turn the flip flop back over to the top.  You should now have two ribbon "straps".  Yay! 
 
7. Pull the left ribbon strap through the hole on the left bottom of the flip flop.  Then, pull the right ribbon strap through the hole on the right bottom of the flip flop.   Be sure to leave enough ribbon on top so your foot can fit.  (It may be helpful to try the flip flop on while you pull the straps through for accuracy.)
 
8. Turn the flop flip over to the bottom. Take the strap on the left and pull it through the hole on the right from back/bottom to front/top. Take the strap on the right and pull it through the hole on the left from back/bottom to front/top.
 
6. Add a bit of glue to each hole to secure the straps. 
 
7. Repeat these steps with your second flip flop.
 
ENJOY!!
 
Special Thanks to my model: Melissa D. :-)

Thursday, May 22, 2014

DIY: Adult Tutu


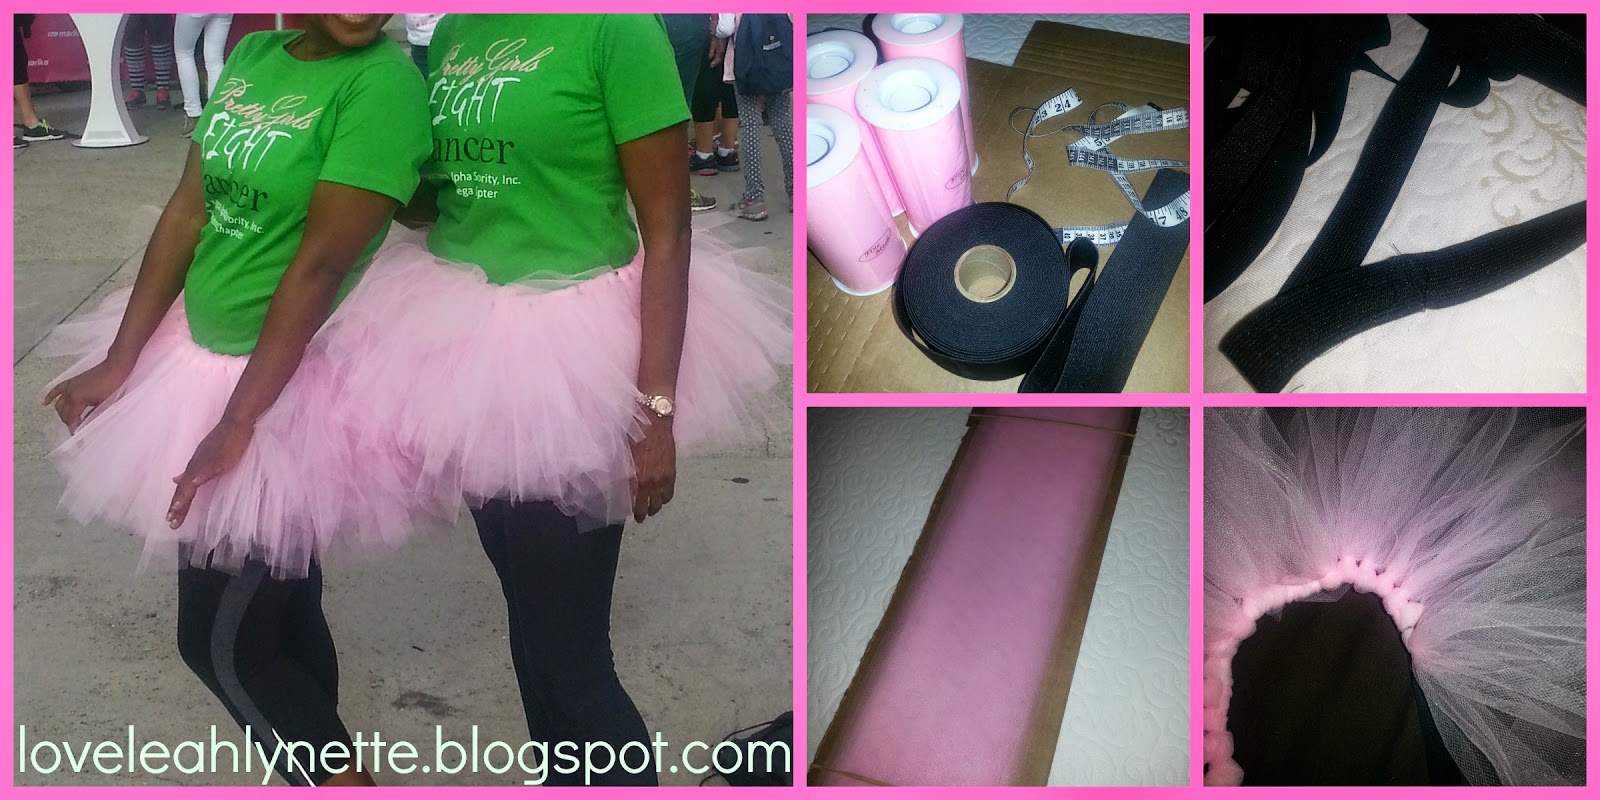
DIY: Adult Tutu...because big princesses need tutu's too :-)


These tutu's were made for the 2014 Revlon Run/Walk. They complimented our "Pretty Girls Fight Cancer" shirts perfectly!

It's super easy to make your own.  Just check out my DIY from: http://loveleahlynette.blogspot.com/2014/01/tutu-from-jurnees-terrible-tu-tus-2nd.html.   It's the same concept with just a few changes.

The Ingredients: This time I used four rolls of 6" tulle, measuring tape, elastic, a 24 inch long strip of cardboard (you can cut this from a box), scissors, two rubber bands

The Purchase Locations: idearibbon.com (the tulle - very, very cheap here),  Downtown LA craft depot (for the elastic)

The Cost: Approx. $5.00

It only took me: about 30 minutes

How to:

1. Take one roll of tulle at a time and wrap it long ways around the 24 inch long strip of card board. When all of the tulle has been wrapped around the cardboard, place a rubber band around the top of the strip and one around the bottom of the strip.  This holds the tulle in place.  Cut the tulle at the top of the cardboard and cut it at the bottom.  Now you have several strips of 24 inch long pieces of tulle.  Repeat this step for each of the rolls of tulle.

2. Measure your waist.  Take between 2-6 inches off (depending on how stretchy your elastic is) and cut the elastic to that length.  NOTE:  The elastic tends to get stretched out as you loop the tulle around it.  So keep that in mind when measuring. No one wants a droopy tutu.  Sew or safety pin the strip of cut elastic together.  Stretch it around something solid (a piece of cardboard, a book, your knee, whatever) so you can start looping the tulle around the elastic. 

5. Take two pieces of tulle (one on top of the other) and fold them in half.  Lay the tulle behind the elastic band so the looped part is on top of the elastic and the rest of the tulle is hanging beneath the elastic band. Grab the two loose ends of tulle, wrap them forward around the elastic band, place the two end pieces between the loop on top of the band.  Then, pull to create a knot.  Repeat this step until your tutu is complete.
Enjoy!

Tuesday, January 28, 2014

Pink Rhinestone Converse Baby Shoes


One night when I couldn't sleep, I made these shoes for my niecy-poo Zylyn.  Probably not the best way to combat insomnia.  But, it was fun. :-)

The Task: Add some pink, sparkly love to the Converse I bought for my niece. 

The Ingredients: shoes, approx. 200 small pink crystal rhinestones (1/4 cm), E6000 glue, a q-tip, Craft Tack, alcohol, a shoe box top

The Purchase Locations: Michael's Arts & Crafts, Downtown LA (for the crystals and shoes), 99 cents only store (for the q-tip and alcohol)

The Cost: Approx. $35.00

It only took me: about two hours

How to:

1.  Where ever you plan to place rhinestones, wipe the area with alcohol.

2. Place a bit of craft tack on the end of a q-tip to create a tool that will allow you to pick up the rhinestones easily.

3. Dump the rhinestones into a shoe box top. I like to lay them out so all the flat sides are down.  This makes them easy to pick up and attach to the shoe.

4. Apply a short, thin line of E6000 glue to the top part of the rubber on the shoe.  Add rhinestones in a line on top of the glue.

5. Repeat step 4 until the entire rubber area (and any other area you want to decorate) is covered in rhinestones.

6. Wipe the rhinestone areas with alcohol after you're done to remove any excess glue from the rhinestones.

OPTION:  You can replace the shoe string with colorful ribbons.

TIPS: Although it is tempting, don't add too much glue at one time.  The glue dries pretty quickly.