Showing posts with label princess. Show all posts

Monday, September 29, 2014

DIY: Doggy Princess Tutu...with pearls

DIY: DOGGY PRINCESS TUTU...with PEARLS


The Task: Make a tutu for a doggy princess named Bella. It was her grandpa's birthday and she needed something cute to wear. 

The Ingredients: 1 roll tulle, stretchy ponytail holder or elastic (Bella is extra small so I used the ponytail holder), ribbon, string of pearls, 16 inch long piece of cardboard, glue gun
  
The Purchase Locations: Downtown LA - craft store, jewelry store

The Cost: Approx $6.00
It took me: about 30 minutes 
How to:
1. Take roll of tulle and wrap it long ways around a 16 inch long strip of card board. When all of the tulle has been wrapped around the cardboard, cut the tulle at the top of the cardboard and cut it at the bottom.  Now you have several strips of 16 inch long pieces of tulle.  Repeat this step for each of the rolls of tulle. 

 2. Stretch the ponytail holder around something solid (a piece of cardboard, a book, your knee, whatever) so you can start knotting the tulle around the ponytail holder.  

3. Take two pieces of tulle (one on top of the other) and fold them in half.  Push the looped part up and behind the ponytail holder, then pull the two ends through the loop to create a knot.  Repeat this step until the entire ponytail holder is full. 
4. Tie a ribbon around the middle of the finished tutu. Glue the ribbon to the tutu (I only glued down the part where Bella's tummy was, so her mom and dad could adjust it to fit her waist, as well as get her in and out of it easily).
5. Cut about two-thirds of the tulle off of the stomach area (so your doggy princess can move around easily).

6.  Add a string of pearls to the tutu.  Tie one end of the pearl string to the left side of the tutu, about an inch above where the top of the front left paw would be.  Then, tie the other end of the pearl string to the right side of the tutu, about an inch above where the top of the front right paw would be.  (Because Bella is extra small, the necklace was waaaayy too big.  So, I had to re-string about 20 pearls onto a stretchy piece of string). 
NOTE: I added a little halter ribbon to the tutu thinking it was necessary to hold the tutu in place, but it wasn't necessary. You live and you learn :-)
ENJOY!!
&
HAPPY BIRTHDAY TO BELLA'S GRANDPA!
Love,
Leah Lynette

Thursday, May 22, 2014

DIY: Adult Tutu


DIY: Adult Tutu...because big princesses need tutu's too :-)


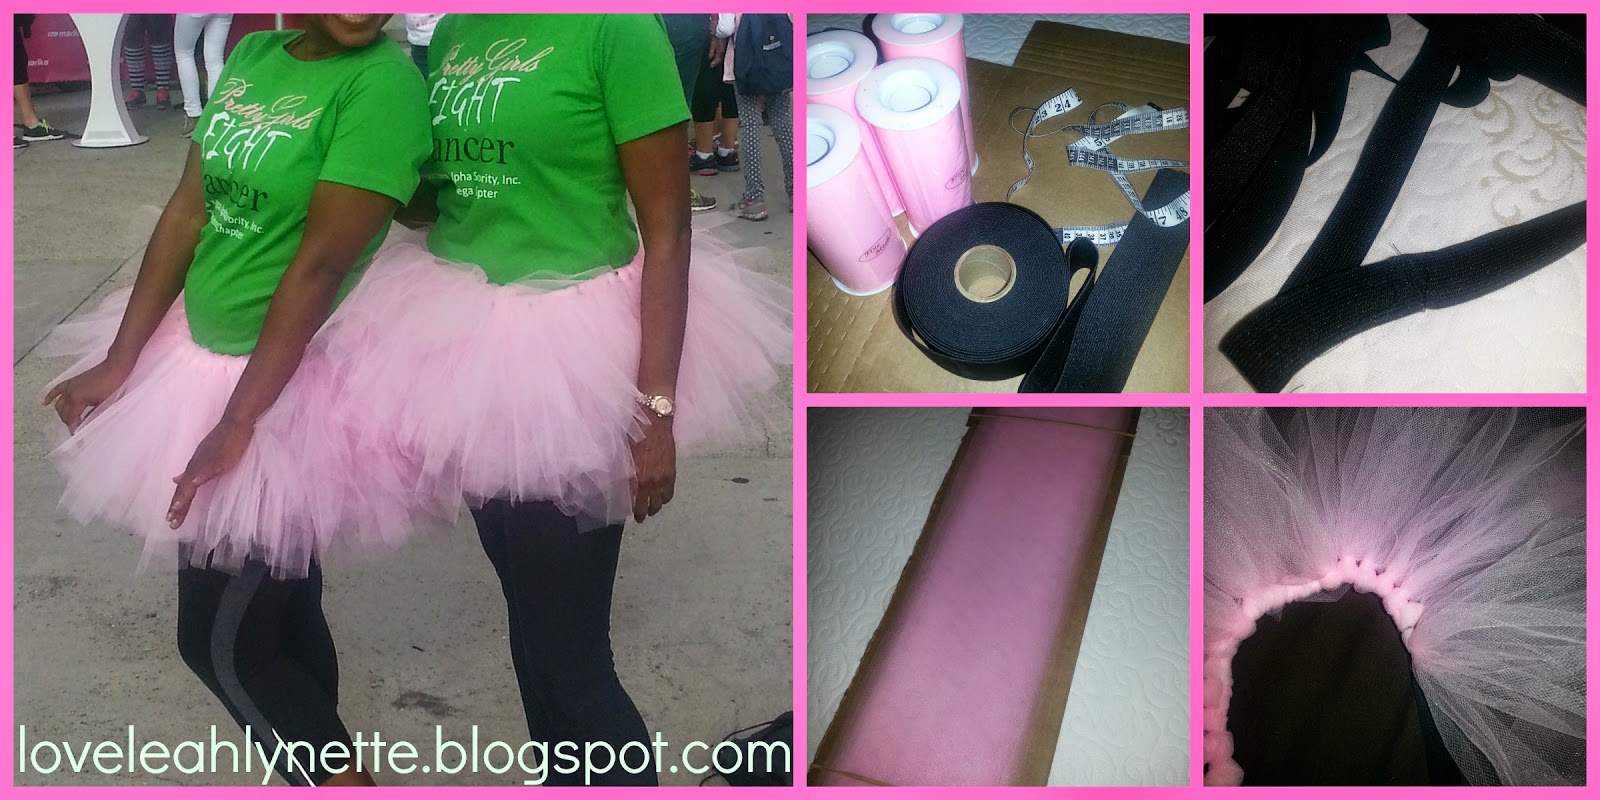
These tutu's were made for the 2014 Revlon Run/Walk. They complimented our "Pretty Girls Fight Cancer" shirts perfectly!

It's super easy to make your own.  Just check out my DIY from: http://loveleahlynette.blogspot.com/2014/01/tutu-from-jurnees-terrible-tu-tus-2nd.html.   It's the same concept with just a few changes.

The Ingredients: This time I used four rolls of 6" tulle, measuring tape, elastic, a 24 inch long strip of cardboard (you can cut this from a box), scissors, two rubber bands

The Purchase Locations: idearibbon.com (the tulle - very, very cheap here),  Downtown LA craft depot (for the elastic)

The Cost: Approx. $5.00

It only took me: about 30 minutes

How to:

1. Take one roll of tulle at a time and wrap it long ways around the 24 inch long strip of card board. When all of the tulle has been wrapped around the cardboard, place a rubber band around the top of the strip and one around the bottom of the strip.  This holds the tulle in place.  Cut the tulle at the top of the cardboard and cut it at the bottom.  Now you have several strips of 24 inch long pieces of tulle.  Repeat this step for each of the rolls of tulle.

2. Measure your waist.  Take between 2-6 inches off (depending on how stretchy your elastic is) and cut the elastic to that length.  NOTE:  The elastic tends to get stretched out as you loop the tulle around it.  So keep that in mind when measuring. No one wants a droopy tutu.  Sew or safety pin the strip of cut elastic together.  Stretch it around something solid (a piece of cardboard, a book, your knee, whatever) so you can start looping the tulle around the elastic. 

5. Take two pieces of tulle (one on top of the other) and fold them in half.  Lay the tulle behind the elastic band so the looped part is on top of the elastic and the rest of the tulle is hanging beneath the elastic band. Grab the two loose ends of tulle, wrap them forward around the elastic band, place the two end pieces between the loop on top of the band.  Then, pull to create a knot.  Repeat this step until your tutu is complete.
Enjoy!

Saturday, February 15, 2014

DIY: Sparkly Baby Rhinestone Converse

After my post a few weeks ago about the Converse I decorated for my niece, I got a request to make another pair.  Yay!  Here's a little picture tutorial.  You can check out my post from Tuesday, January 28, 2014 "Pink Rhinestone Converse Baby Shoes" for the written step-by-step on how to make these cute little shoes.
 

There were a few differences between these shoes and the last pair I did. 

1. These shoes were a Converse All-Star size 4 and they were soft bottoms. They were only $20.00.  I was told the baby wore a size 10.  So, I ordered an "Infant Size 10" online and got a pair of gigantic shoes.  I could almost fit them. I'm not sure what kind of infants Converse had in mind when they made those shoes. :-|  So, I went to the store and saw that Converse baby shoes run from 0-4.  And, they are soft soles.  Although, the 4's do come in hard bottoms sometimes.   Either way, the rhinestone application was still the same for the hard vs. soft bottoms.  I just want everyone to be aware that, to Converse, an "infant" is the size of a 7 years old. So, keep that in mind when you order. :-)

2. This time around I put the E-6000 glue into a plastic applicator with a tip on it.  This made glue application much easier and a lot less messy.  You can purchase the tubes in bulk from a craft store (approx.. 8 per package) for about $3.00.

3. This time I switched out the laces for pink ribbon.  If you look at the picture of all the items I used to make the shoes, you'll notice two different ribbons than the ribbon in the finished product.  That's because those ribbons, while adorable, were too thick to put through those teeny tiny grommets.   So, my suggestion is you use thin, wireless ribbon for your shoe laces if you plan to trade them out.

4.  This time it only took me about an hour to complete the shoes.  I think it was because the shoes were teeny weeny and because I used that plastic applicator for the glue.

Enjoy!