Showing posts with label tutu. Show all posts

Monday, September 29, 2014

DIY: Doggy Princess Tutu...with pearls

DIY: DOGGY PRINCESS TUTU...with PEARLS


The Task: Make a tutu for a doggy princess named Bella. It was her grandpa's birthday and she needed something cute to wear. 

The Ingredients: 1 roll tulle, stretchy ponytail holder or elastic (Bella is extra small so I used the ponytail holder), ribbon, string of pearls, 16 inch long piece of cardboard, glue gun
  
The Purchase Locations: Downtown LA - craft store, jewelry store

The Cost: Approx $6.00
It took me: about 30 minutes 
How to:
1. Take roll of tulle and wrap it long ways around a 16 inch long strip of card board. When all of the tulle has been wrapped around the cardboard, cut the tulle at the top of the cardboard and cut it at the bottom.  Now you have several strips of 16 inch long pieces of tulle.  Repeat this step for each of the rolls of tulle. 

 2. Stretch the ponytail holder around something solid (a piece of cardboard, a book, your knee, whatever) so you can start knotting the tulle around the ponytail holder.  

3. Take two pieces of tulle (one on top of the other) and fold them in half.  Push the looped part up and behind the ponytail holder, then pull the two ends through the loop to create a knot.  Repeat this step until the entire ponytail holder is full. 
4. Tie a ribbon around the middle of the finished tutu. Glue the ribbon to the tutu (I only glued down the part where Bella's tummy was, so her mom and dad could adjust it to fit her waist, as well as get her in and out of it easily).
5. Cut about two-thirds of the tulle off of the stomach area (so your doggy princess can move around easily).

6.  Add a string of pearls to the tutu.  Tie one end of the pearl string to the left side of the tutu, about an inch above where the top of the front left paw would be.  Then, tie the other end of the pearl string to the right side of the tutu, about an inch above where the top of the front right paw would be.  (Because Bella is extra small, the necklace was waaaayy too big.  So, I had to re-string about 20 pearls onto a stretchy piece of string). 
NOTE: I added a little halter ribbon to the tutu thinking it was necessary to hold the tutu in place, but it wasn't necessary. You live and you learn :-)
ENJOY!!
&
HAPPY BIRTHDAY TO BELLA'S GRANDPA!
Love,
Leah Lynette

Thursday, May 22, 2014

DIY: Adult Tutu


DIY: Adult Tutu...because big princesses need tutu's too :-)


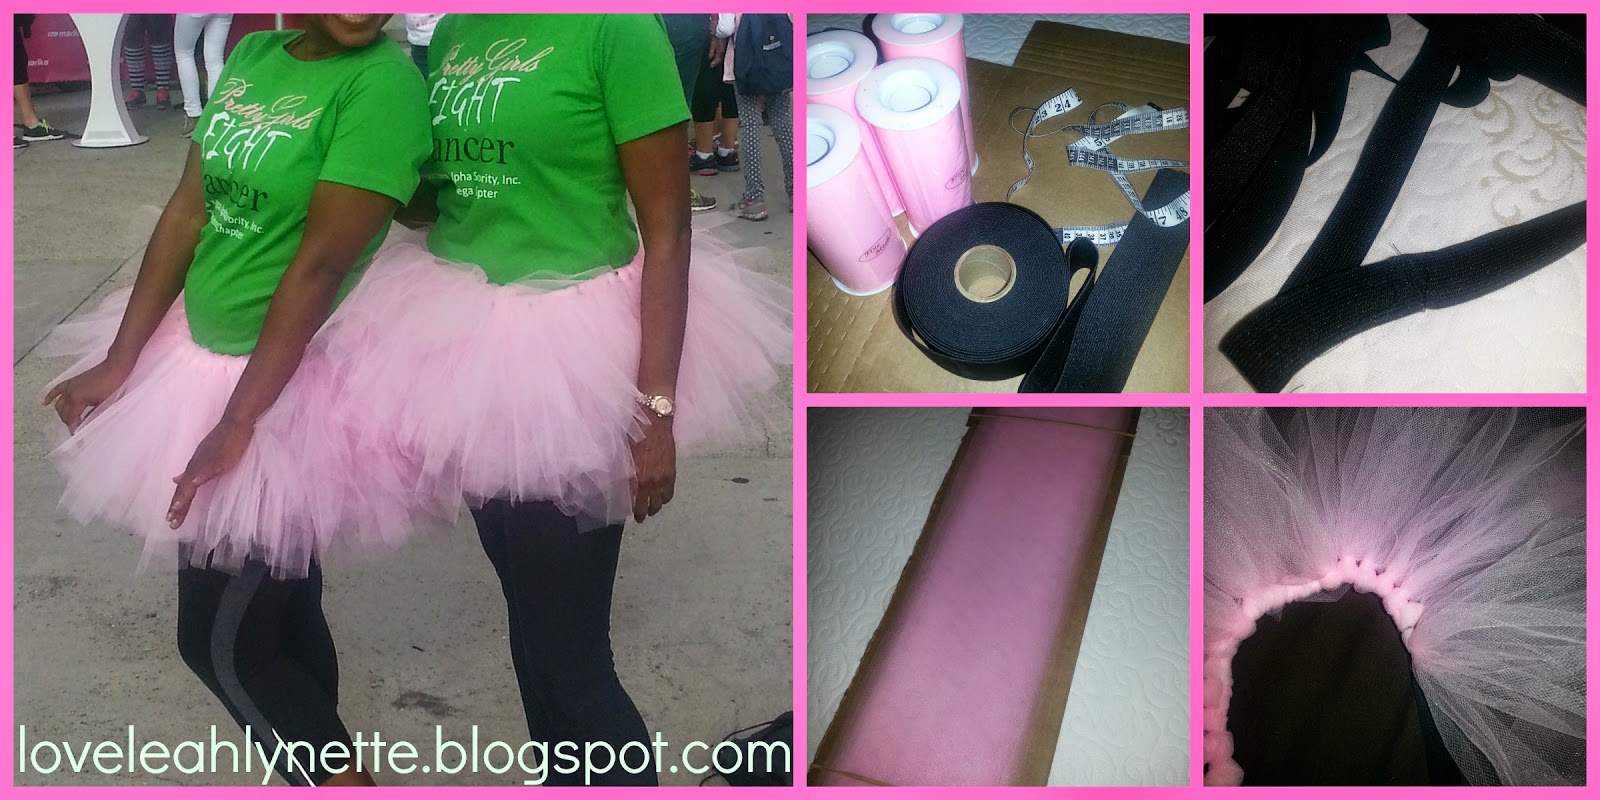
These tutu's were made for the 2014 Revlon Run/Walk. They complimented our "Pretty Girls Fight Cancer" shirts perfectly!

It's super easy to make your own.  Just check out my DIY from: http://loveleahlynette.blogspot.com/2014/01/tutu-from-jurnees-terrible-tu-tus-2nd.html.   It's the same concept with just a few changes.

The Ingredients: This time I used four rolls of 6" tulle, measuring tape, elastic, a 24 inch long strip of cardboard (you can cut this from a box), scissors, two rubber bands

The Purchase Locations: idearibbon.com (the tulle - very, very cheap here),  Downtown LA craft depot (for the elastic)

The Cost: Approx. $5.00

It only took me: about 30 minutes

How to:

1. Take one roll of tulle at a time and wrap it long ways around the 24 inch long strip of card board. When all of the tulle has been wrapped around the cardboard, place a rubber band around the top of the strip and one around the bottom of the strip.  This holds the tulle in place.  Cut the tulle at the top of the cardboard and cut it at the bottom.  Now you have several strips of 24 inch long pieces of tulle.  Repeat this step for each of the rolls of tulle.

2. Measure your waist.  Take between 2-6 inches off (depending on how stretchy your elastic is) and cut the elastic to that length.  NOTE:  The elastic tends to get stretched out as you loop the tulle around it.  So keep that in mind when measuring. No one wants a droopy tutu.  Sew or safety pin the strip of cut elastic together.  Stretch it around something solid (a piece of cardboard, a book, your knee, whatever) so you can start looping the tulle around the elastic. 

5. Take two pieces of tulle (one on top of the other) and fold them in half.  Lay the tulle behind the elastic band so the looped part is on top of the elastic and the rest of the tulle is hanging beneath the elastic band. Grab the two loose ends of tulle, wrap them forward around the elastic band, place the two end pieces between the loop on top of the band.  Then, pull to create a knot.  Repeat this step until your tutu is complete.
Enjoy!

Monday, January 20, 2014

Tutu from Jurnee's Terrible Tu-Tu's 2nd Birthday Party


I really enjoy making tutus. They're cute and colorful and glittery.  And, what little girl doesn't feel like a princess in a tutu?

This tutu was inspired by my dear grandmother, Gaynelle (aka my Good Ole Gran).  Gran would sew dresses for me when I was a kid.  And, she would always sew a little bell under each of my dresses.  I would run and jump and skip around because I LOVED to hear the little bell jingle.  So, I put a few bells in Jurnee's tutu.  At the party, Jurnee's grandmother kept noticing she was skipping and jumping much more than usual.  We eventually realized that it was the bells.  Every time she moved, she heard the bells and loved them as much as I did when I was her age. :-)

The Task: Create a tutu fit for a princess for little Jurnee's 2nd birthday party.  The theme was Terrible Tu-Tu's .  The colors were pink, green and blue.  [There are a few ways to make tutus.  I like them to be really full, so I chose this method.]

The Ingredients: Three rolls of 6" tulle, plain and glitter (25 yards each), a colorful crochet headband, an 18 inch long strip of cardboard (you can cut this from a box), scissors, two rubber bands, tiny bells, thin ribbon, small rhinestones, E6000 glue and various trinkets to add to the waistband  [Important: The glitter on glitter tulle is not very secure.  So, make sure you cover your work area.]   

The Purchase Locations: Michael's Arts & Crafts (don't forget to print out your discount coupon before you go), the Craft Depot (Downtown LA), Dollar Tree

The Cost: Approx. $20.00 (NOTE: You can make this tutu for about $10.00 if you don't add the trinkets and don't use glitter tulle)

It only took me: about two hours

How to:

1. Remove the plastic rings on the end of each roll of tulle.  Then, take the cardboard roll out of the center of each of the rolls of tulle (be sure to keep the roll intact).  This takes some maneuvering, but it'll make your life a lot easier.  Trust me on this. 

2. Cut each roll of tulle in half (3 inches wide) so you end up with 6 rolls of tulle.

3.  Take one roll at a time and wrap it long ways around the 18 inch long strip of card board. When all of the tulle has been wrapped around the cardboard, place a rubber band around the top of the strip and one around the bottom of the strip.  This holds the tulle in place.  Cut the tulle at the top of the cardboard and cut it at the bottom.  Now you have several strips of 18 inch long pieces of tulle.  Repeat this step for each of the rolls of tulle.

4. Stretch the crochet headband around something solid (a piece of cardboard, a book, your knee, whatever) so you can start weaving the tulle through the headband. 

5. Take two pieces of tulle (one on top of the other) and fold them in half.  Push the looped part of the tulle through the base of the headband, then pull the two ends through the loop to create a knot.  Repeat this step above your first knot, two more times.  You'll end up with a row with three knots. 

6. Move over to the next open space on the base of the headband and repeat step 5 until all the tulle has been used.  You can use any color combination you choose.

7.  Take a few tiny bells and string a thin piece of ribbon through each one.  Tie each one around a loop in the crochet headband. 

8. Cut the stems off of the plastic flowers.  Place a bit of E6000 glue on the back of the flower to hold the flower together. 

9.  Glue trinkets to the center of each flower.  I put a "Happy Birthday" trinket on one flower, a J on the second flower (J for Jurnee), and two candles on the third flower (since she was turning 2 years old).

10.  Glue each flower to the top of the crochet headband. 

11.  Glue a few rhinestones on the tulle to add more sparkle. 

HAPPY 2nd BIRTHDAY, JURNEE!!  Thank you Gran for continuing to inspire me!   And, thank you to Just Add A Bow for their excellent video demonstration on how to make the tutu full and fluffy (https://www.youtube.com/watch?v=35kRpNIXupw)