Showing posts with label pink. Show all posts

Thursday, May 22, 2014

DIY: Adult Tutu


DIY: Adult Tutu...because big princesses need tutu's too :-)


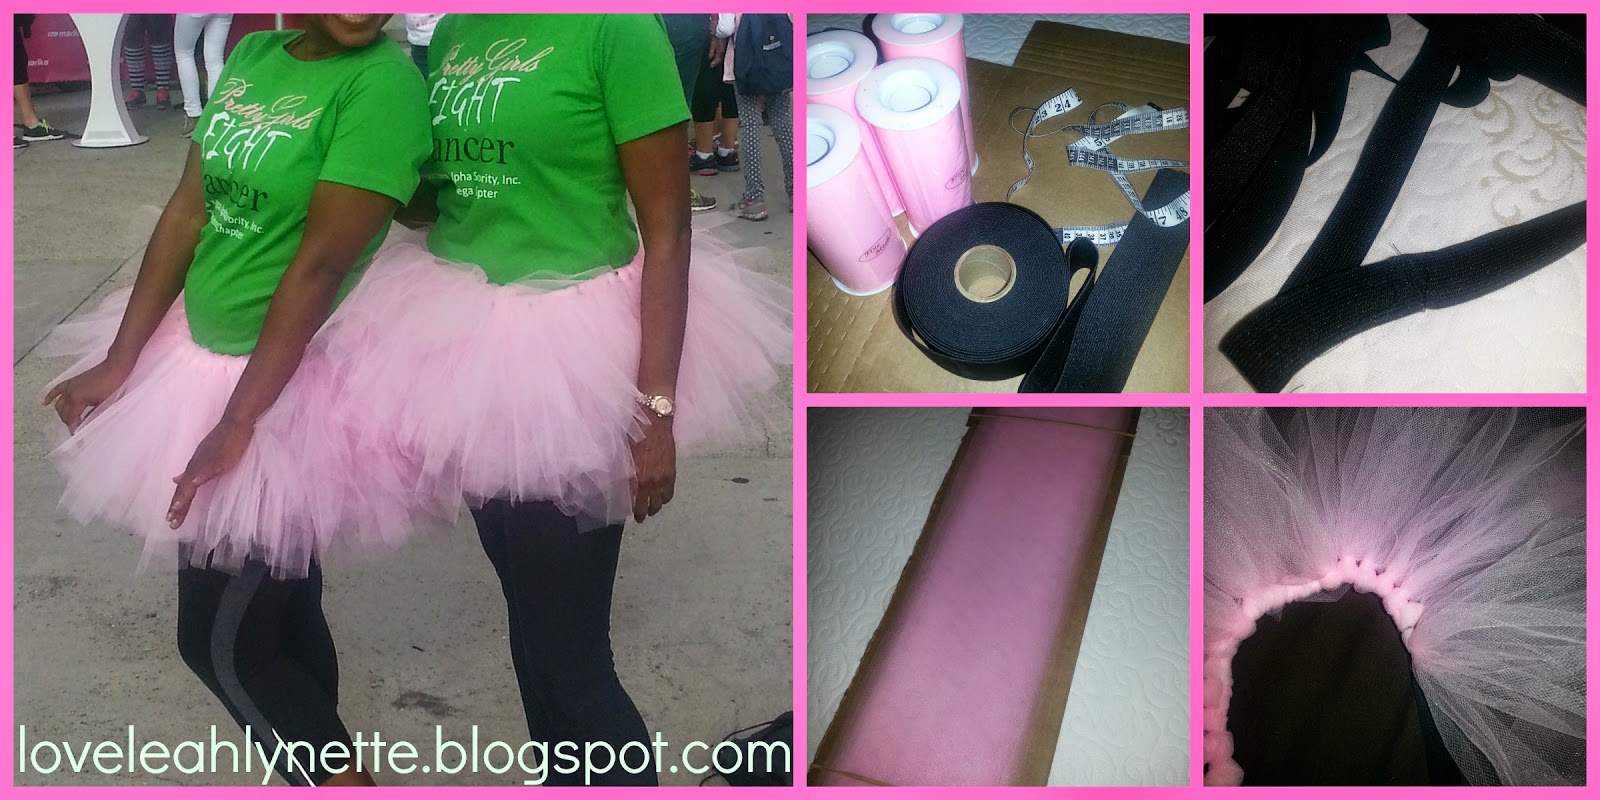
These tutu's were made for the 2014 Revlon Run/Walk. They complimented our "Pretty Girls Fight Cancer" shirts perfectly!

It's super easy to make your own.  Just check out my DIY from: http://loveleahlynette.blogspot.com/2014/01/tutu-from-jurnees-terrible-tu-tus-2nd.html.   It's the same concept with just a few changes.

The Ingredients: This time I used four rolls of 6" tulle, measuring tape, elastic, a 24 inch long strip of cardboard (you can cut this from a box), scissors, two rubber bands

The Purchase Locations: idearibbon.com (the tulle - very, very cheap here),  Downtown LA craft depot (for the elastic)

The Cost: Approx. $5.00

It only took me: about 30 minutes

How to:

1. Take one roll of tulle at a time and wrap it long ways around the 24 inch long strip of card board. When all of the tulle has been wrapped around the cardboard, place a rubber band around the top of the strip and one around the bottom of the strip.  This holds the tulle in place.  Cut the tulle at the top of the cardboard and cut it at the bottom.  Now you have several strips of 24 inch long pieces of tulle.  Repeat this step for each of the rolls of tulle.

2. Measure your waist.  Take between 2-6 inches off (depending on how stretchy your elastic is) and cut the elastic to that length.  NOTE:  The elastic tends to get stretched out as you loop the tulle around it.  So keep that in mind when measuring. No one wants a droopy tutu.  Sew or safety pin the strip of cut elastic together.  Stretch it around something solid (a piece of cardboard, a book, your knee, whatever) so you can start looping the tulle around the elastic. 

5. Take two pieces of tulle (one on top of the other) and fold them in half.  Lay the tulle behind the elastic band so the looped part is on top of the elastic and the rest of the tulle is hanging beneath the elastic band. Grab the two loose ends of tulle, wrap them forward around the elastic band, place the two end pieces between the loop on top of the band.  Then, pull to create a knot.  Repeat this step until your tutu is complete.
Enjoy!

Thursday, May 15, 2014

New Baby Girl...New Sparkly Shoes


These were a gift to a 'new mommy' in my life.

Check out: http://loveleahlynette.blogspot.com/2014/02/diy-sparkly-baby-rhinestone-converse.html for details on how to make these.

This time I added a rhinestone heart to the shoe.  I drew the outline of the heart with a sharpie.  Then, I glued the heart on top of the outline.  And, I added rhinestones all around. 

I also used some cute pink and green ribbon for shoelaces.

ENJOY!!  

Saturday, February 15, 2014

DIY: Sparkly Baby Rhinestone Converse

After my post a few weeks ago about the Converse I decorated for my niece, I got a request to make another pair.  Yay!  Here's a little picture tutorial.  You can check out my post from Tuesday, January 28, 2014 "Pink Rhinestone Converse Baby Shoes" for the written step-by-step on how to make these cute little shoes.
 

There were a few differences between these shoes and the last pair I did. 

1. These shoes were a Converse All-Star size 4 and they were soft bottoms. They were only $20.00.  I was told the baby wore a size 10.  So, I ordered an "Infant Size 10" online and got a pair of gigantic shoes.  I could almost fit them. I'm not sure what kind of infants Converse had in mind when they made those shoes. :-|  So, I went to the store and saw that Converse baby shoes run from 0-4.  And, they are soft soles.  Although, the 4's do come in hard bottoms sometimes.   Either way, the rhinestone application was still the same for the hard vs. soft bottoms.  I just want everyone to be aware that, to Converse, an "infant" is the size of a 7 years old. So, keep that in mind when you order. :-)

2. This time around I put the E-6000 glue into a plastic applicator with a tip on it.  This made glue application much easier and a lot less messy.  You can purchase the tubes in bulk from a craft store (approx.. 8 per package) for about $3.00.

3. This time I switched out the laces for pink ribbon.  If you look at the picture of all the items I used to make the shoes, you'll notice two different ribbons than the ribbon in the finished product.  That's because those ribbons, while adorable, were too thick to put through those teeny tiny grommets.   So, my suggestion is you use thin, wireless ribbon for your shoe laces if you plan to trade them out.

4.  This time it only took me about an hour to complete the shoes.  I think it was because the shoes were teeny weeny and because I used that plastic applicator for the glue.

Enjoy!

Tuesday, January 28, 2014

Pink Rhinestone Converse Baby Shoes


One night when I couldn't sleep, I made these shoes for my niecy-poo Zylyn.  Probably not the best way to combat insomnia.  But, it was fun. :-)

The Task: Add some pink, sparkly love to the Converse I bought for my niece. 

The Ingredients: shoes, approx. 200 small pink crystal rhinestones (1/4 cm), E6000 glue, a q-tip, Craft Tack, alcohol, a shoe box top

The Purchase Locations: Michael's Arts & Crafts, Downtown LA (for the crystals and shoes), 99 cents only store (for the q-tip and alcohol)

The Cost: Approx. $35.00

It only took me: about two hours

How to:

1.  Where ever you plan to place rhinestones, wipe the area with alcohol.

2. Place a bit of craft tack on the end of a q-tip to create a tool that will allow you to pick up the rhinestones easily.

3. Dump the rhinestones into a shoe box top. I like to lay them out so all the flat sides are down.  This makes them easy to pick up and attach to the shoe.

4. Apply a short, thin line of E6000 glue to the top part of the rubber on the shoe.  Add rhinestones in a line on top of the glue.

5. Repeat step 4 until the entire rubber area (and any other area you want to decorate) is covered in rhinestones.

6. Wipe the rhinestone areas with alcohol after you're done to remove any excess glue from the rhinestones.

OPTION:  You can replace the shoe string with colorful ribbons.

TIPS: Although it is tempting, don't add too much glue at one time.  The glue dries pretty quickly.      


Friday, January 17, 2014

Baby Niko's Hello Kitty Shower


Here are some party favors and decorations I did for my friend Tia's baby shower.  Her baby luckily waited until her due date to make her debut.  So, we were able to have a super fun shower. :-)

Tia requested a Hello Kitty baby shower!  So, I went Hello Kitty crazy with the decorations and favors!  There wasn't much in the room that didn't have Hello Kitty on it.

The party was held at Tia's apartment.  There is a huge mirror in her living room.  So, I printed out some letters on transparent removable decal paper (available at any office supply store) to make a welcome sign for baby.

The water beads made their debut again in the centerpieces.  This time, I added some pink jewels to the vase and a waterproof light to make the centerpieces sparkle.  I also added little Hello Kitty trinkets to each centerpiece.

For the favors, I got some sheets of small dot stickers from an office supply store and printed the shower date, baby's name and a Hello Kitty logo on each dot.  I got some Hershey Kisses and placed a sticky dot on the bottom of each Kiss.  I filled little take-out containers with the Kisses and added a 'Thank You' label to the outside of each container.

Overall, it was a sweet shower for a sweet baby girl!